Find your way around a service job
The job screen carries more than it first appears, and most of what you will need day to day is on it. In this walkthrough we will open a real job and learn to read it — no changes, nothing to undo. By the end you will know where the customer's problem, the engineer's visit and the parts all live.
Before we start
You need a BMS account with a Service role, and at least one open job in the list. Any job will do; we will use one that has been attended once already.
Step 1 — Open the Jobs list
From the main menu, go to Service → Jobs.
You should see a list of jobs with tabs across the top, opening on Unallocated. That tab is jobs nobody has picked up yet, which is why it is the one you land on.
Step 2 — Open a job with two activities
The narrow first column counts the job's activities. Find a row showing 2 and click its job number.
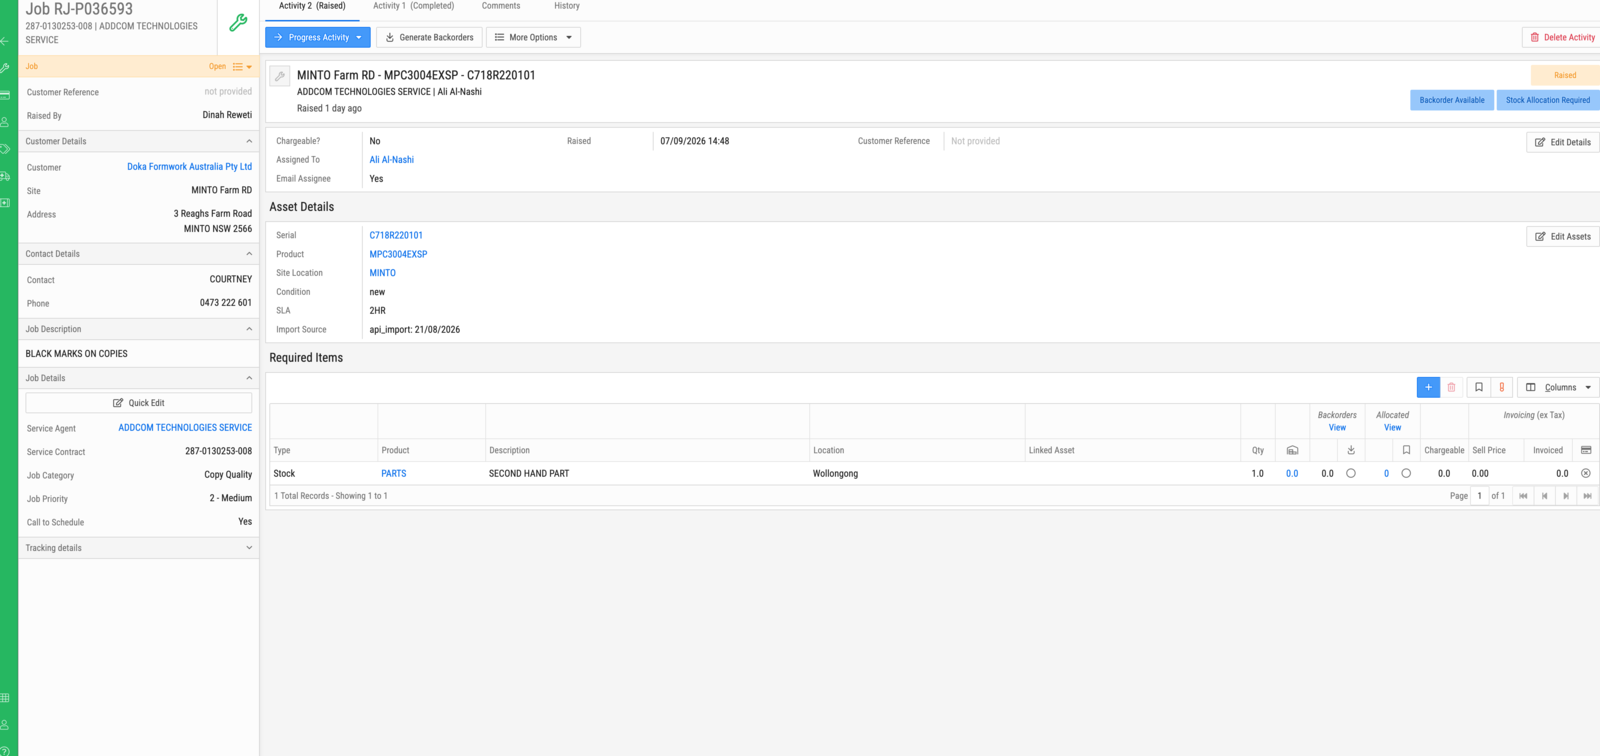
You should see the job screen split in two: a summary column down the left, and the current activity filling the rest.
Step 3 — Read the left column
This is the job itself — the customer's problem, and it does not change as engineers come and go.
Read down it: Customer Details (who and where), Contact Details (who to call), Job Description (what they told you), and Job Details (the service agent, the contract, the category and priority).
Notice the coloured strip at the top of that column. That is the job's status.
Step 4 — Read the tabs
Along the top are Activity 2, Activity 1, Comments and History. Each activity is one visit. Click Activity 1.
You should see a different assignee, dates and parts from Activity 2 — a separate attempt at the same problem.
Click back onto the highest-numbered activity. That is the live one.
Step 5 — Read the activity
This is the visit. Assigned To is the engineer, and the badge on the right is the activity's own state. Asset Details is the machine — serial, product, site and SLA.
Below that, Required Items lists the parts and labour this visit needs, with their quantity, whether they are chargeable, and columns for backorders, allocation and invoicing.
Step 6 — Compare the two statuses
Go back to the Jobs list and find your job. Look at its Status column, then reopen the job and look at the strip on the left.
They can differ — the list shows how the current activity is going, the job screen shows where the job as a whole has got to. Knowing which one you are looking at saves a lot of confusion.
What we did
You can now read a service job: the problem on the left, the visit in the middle, the parts at the bottom, and the earlier attempts one tab away.
Next:
- Work the unallocated queue — doing this for real
- Job and activity statuses — what each state means